Difference between revisions of "Groups Panel"
LightForge (talk | contribs) (→Edit: format) |
LightForge (talk | contribs) (+cat) |
||
| (7 intermediate revisions by the same user not shown) | |||
| Line 1: | Line 1: | ||
[[File:Groups-panel.gif|right|thumb]] | [[File:Groups-panel.gif|right|thumb]] | ||
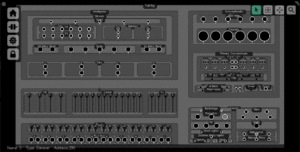
All lighting fixtures within Lightforge are organized into logical groups. If you want to adjust the intensity of a fixture, or a group of fixtures, all you have to do is select it's group and adjust the intensity. By doing so all lighting fixtures in that group will change to the new value. Want to change multiple groups? Select the parent group that contains the children and make your change, and you are done. This philosophy is consistent with any change you want to make on your lighting rig, from color, to effects, to any other setting. It allows you to easily and visually manage your lighting rig without having to try and remember channel numbers, or addresses. | |||
== Important Concepts == | == Important Concepts == | ||
| Line 10: | Line 10: | ||
== The Toolbar == | == The Toolbar == | ||
[[FILE:Groups-toolbar.gif|right|thumb]] | [[FILE:Groups-toolbar.gif|right|thumb]] | ||
'''Home:''' | |||
'' | {{Small Shortcut |Home}} | ||
The Home tool centers your viewport on the lighting rig and zooms to fit it in the viewport. | The Home tool centers your viewport on the lighting rig and zooms to fit it in the viewport. | ||
'''Release:''' | |||
'' | {{Small Shortcut |R}} | ||
The Release tool releases any held values in all selected fixtures or groups. | The Release tool releases any held values in all selected fixtures or groups. | ||
'''Edit:''' | |||
'' | {{Small Shortcut |Enter}} | ||
The Edit tool toggles edit mode for the selected groups or fixtures. To change positioning of groups, add, delete or edit fixtures, you need to be in edit mode. | The Edit tool toggles edit mode for the selected groups or fixtures. To change positioning of groups, add, delete or edit fixtures, you need to be in edit mode. | ||
'''Lock:''' | |||
The Lock tool toggles lock mode for the selected groups or fixtures. When a group is locked it continues outputting the values it was at when it was locked until you unlock it. This allows you to turn a certain group or fixture on and lock it (house lights for example), and then record all your cues with the houselights off for your show, while still keeping them on while you are programming. | The Lock tool toggles lock mode for the selected groups or fixtures. When a group is locked it continues outputting the values it was at when it was locked until you unlock it. This allows you to turn a certain group or fixture on and lock it (house lights for example), and then record all your cues with the houselights off for your show, while still keeping them on while you are programming. | ||
== The Info Bar == | == The Info Bar == | ||
[[File:Groups-infobar.jpg|right|thumb]] | [[File:Groups-infobar.jpg|right|thumb|Info bar on the bottom showing the Name, Type and Address of the fixture]] | ||
The info bar gives information on the group, fixture, or tool that the mouse cursor is currently over. | The info bar gives information on the group, fixture, or tool that the mouse cursor is currently over. | ||
==Working with Groups== | ==Working with Groups== | ||
'''Adding Groups:''' | |||
To add a group, first place it's parent group in edit mode by selecting it and pressing "Enter" or pressing the edit icon on the toolbar. Once in edit mode right click on the group and select "Add Group" from the context menu. This will bring up a dialog asking you to enter the name of the group and how many columns and rows to assign to it. Each cell in the grid created by this can be assigned a group or a fixture. | To add a group, first place it's parent group in edit mode by selecting it and pressing "Enter" or pressing the edit icon on the toolbar. Once in edit mode right click on the group and select "Add Group" from the context menu. This will bring up a dialog asking you to enter the name of the group and how many columns and rows to assign to it. Each cell in the grid created by this can be assigned a group or a fixture. | ||
'''Editing Groups:''' | |||
To edit a group, first place it in edit mode, then right click on the group and select "Edit" from the context menu. This will bring up a dialog asking you to enter the name of the group and how many columns and rows to assign to it. | To edit a group, first place it in edit mode, then right click on the group and select "Edit" from the context menu. This will bring up a dialog asking you to enter the name of the group and how many columns and rows to assign to it. | ||
'''Adding Fixtures:''' | |||
To add a fixture, place the group you want to add it to in edit mode, then right click on the group, and click "Add Fixture" in the context menu. This will bring up the [[Fixture Dialog]] to allow you to choose how to patch your new fixtures. | To add a fixture, place the group you want to add it to in edit mode, then right click on the group, and click "Add Fixture" in the context menu. This will bring up the [[Fixture Dialog]] to allow you to choose how to patch your new fixtures. | ||
'''Editing Fixtures:''' | |||
To edit a fixture, place the fixture you want to edit it to in edit mode, then right click on the fixture, and click "edit" in the context menu. This will bring up the [[Fixture Dialog]] to allow edit your fixture settings. | To edit a fixture, place the fixture you want to edit it to in edit mode, then right click on the fixture, and click "edit" in the context menu. This will bring up the [[Fixture Dialog]] to allow edit your fixture settings. | ||
'''Rearranging and Scaling Groups and Fixtures:''' | |||
To rearrange your group layout, place whatever groups or fixtures you are wanting to rearrange into edit mode, and click and drag the group or fixture to the cell you would like it to occupy. To scale a group click and drag the scaling handles on the group or fixture. | To rearrange your group layout, place whatever groups or fixtures you are wanting to rearrange into edit mode, and click and drag the group or fixture to the cell you would like it to occupy. To scale a group click and drag the scaling handles on the group or fixture. | ||
| Line 55: | Line 50: | ||
'''Salmon Background''' - These groups or fixtures are currently set to be locked. | '''Salmon Background''' - These groups or fixtures are currently set to be locked. | ||
==Video Tutorial== | |||
* [https://www.youtube.com/watch?v=-6Ryo-av0x8 YouTube: Lightforge Groups Panel and Patching Tutorial] | |||
==See Also== | ==See Also== | ||
*[[Keyboard & Mouse Shortcuts]] | *[[Keyboard & Mouse Shortcuts]] | ||
[[Category: LightForge]] | |||
Latest revision as of 16:51, 18 April 2022
All lighting fixtures within Lightforge are organized into logical groups. If you want to adjust the intensity of a fixture, or a group of fixtures, all you have to do is select it's group and adjust the intensity. By doing so all lighting fixtures in that group will change to the new value. Want to change multiple groups? Select the parent group that contains the children and make your change, and you are done. This philosophy is consistent with any change you want to make on your lighting rig, from color, to effects, to any other setting. It allows you to easily and visually manage your lighting rig without having to try and remember channel numbers, or addresses.
Important Concepts
Within Lightforge, all lighting fixtures are organized into groups, subgroups, sub-subgroups, etc. Any change made to any group will affect all of the children of that group. If you select a group that contains the entire lighting rig, and change the intensity, it'll change the intensity of all of the children of that group. When cues are stored whatever is select is what is stored. So if a group is selected then it is the group that has those attributes stored, not the individual fixtures.
The Layout
The groups panel contains two types of objects; groups, and fixtures. Groups are rounded rectangles, and fixtures are circles. Fixtures give indications of basic attributes such as intensity, pan, tilt, and color.
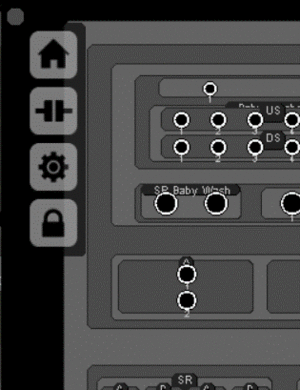
The Toolbar
Home:
Keyboard Shortcut:
Home
The Home tool centers your viewport on the lighting rig and zooms to fit it in the viewport.
Release:
Keyboard Shortcut:
R
The Release tool releases any held values in all selected fixtures or groups.
Edit:
Keyboard Shortcut:
Enter
The Edit tool toggles edit mode for the selected groups or fixtures. To change positioning of groups, add, delete or edit fixtures, you need to be in edit mode.
Lock: The Lock tool toggles lock mode for the selected groups or fixtures. When a group is locked it continues outputting the values it was at when it was locked until you unlock it. This allows you to turn a certain group or fixture on and lock it (house lights for example), and then record all your cues with the houselights off for your show, while still keeping them on while you are programming.
The Info Bar
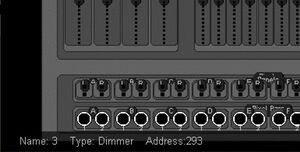
The info bar gives information on the group, fixture, or tool that the mouse cursor is currently over.
Working with Groups
Adding Groups: To add a group, first place it's parent group in edit mode by selecting it and pressing "Enter" or pressing the edit icon on the toolbar. Once in edit mode right click on the group and select "Add Group" from the context menu. This will bring up a dialog asking you to enter the name of the group and how many columns and rows to assign to it. Each cell in the grid created by this can be assigned a group or a fixture.
Editing Groups: To edit a group, first place it in edit mode, then right click on the group and select "Edit" from the context menu. This will bring up a dialog asking you to enter the name of the group and how many columns and rows to assign to it.
Adding Fixtures: To add a fixture, place the group you want to add it to in edit mode, then right click on the group, and click "Add Fixture" in the context menu. This will bring up the Fixture Dialog to allow you to choose how to patch your new fixtures.
Editing Fixtures: To edit a fixture, place the fixture you want to edit it to in edit mode, then right click on the fixture, and click "edit" in the context menu. This will bring up the Fixture Dialog to allow edit your fixture settings.
Rearranging and Scaling Groups and Fixtures: To rearrange your group layout, place whatever groups or fixtures you are wanting to rearrange into edit mode, and click and drag the group or fixture to the cell you would like it to occupy. To scale a group click and drag the scaling handles on the group or fixture.
Color Coding
Orange Outline - The outlined fixture or group is holding values. These values will override any values set in the current cues. When you record a cue, or a palette, these held values get saved into the cue or palette, and then the groups or fixtures are releases. To set a group or fixture to hold values, select the fixture and change any attribute (pan, tilt, color, intensity, etc. To release the hold either press the R key, or press the release button in the groups panel.
Salmon Background - These groups or fixtures are currently set to be locked.


